2010年11月23日 星期二

iPhone UIImage的圓角效果及橫向splash screen

原本以為這兩件事情是有難度的,
還好是自己嚇自己~
參考看看囉:)

UIImage圓角效果
1. 找到左側列表的Frameworks,右鍵加入existing frameworks
QuartzCore.framework

2. 記得在.m的檔案也加入
#import

3. 設定圖片來源的同時也設定圓角效果的屬性
imageView.layer.cornerRadius = 5.0;
imageView.layer.masksToBounds = YES;

//And to add a border:
imageView.layer.borderColor = [UIColor lightGrayColor].CGColor;
imageView.layer.borderWidth = 1.0;
imageView.image = [UIImage imageNamed:@"image.png"];

比較一下有無圓角的效果吧~

載入橫向的splash screen
根據網路上的結論是…辦不到!!
ㄜ~程式上是辦不到,不過圖片可以動手腳
iPhone的Default.png請轉90度,變成320x480
iPad的Default.png請轉90度,變成768x1024


資料來源:
           iPhoneSDKPro
           iphonedevsdk

2010年11月8日 星期一

iPhone can't change language of Xcode

寫程式或許會遇到丈二金剛摸不著頭緒的時候
debug可能會嚐到眼花撩亂頭暈目眩的情形
但是當你碰上Xcode的build setting語言改不掉


一開始會很火大…
阿不就系統設定(system preference)裡面
語言與文字選項(language and text)順序調整一下
再不然,狠一點從list上面移除

再來會很無奈
重開Xcode,登出登入,重開機,無濟於事阿!!!

最後會掉入絕望的深淵
只能看著像是外星來的語言
冒著error,warning無情的嘲弄
猜測屬性的設定,這邊試試看,那邊試試看

不是我歧視日文,而是真的完全看不懂阿
不能這樣溫良恭儉讓下去了~
好不容易我找到了大絕招,這樣做就對了!

1. 首先找到Developer -> Application -> Xcode
2. Ctrl + click -> Show Package Contents -> Resource
3. 把那個叫Japanese.lproj 整個砍了吧!!

重新開啟Xocde,迎接清爽的build setting page吧 :)

資料來源: macosx.com

2010年11月3日 星期三

iPhone 自訂navigation bar全攻略 包含按鈕,高度及圖片背景

iPhone的UI真的有很多小細節,我想也累積一些東西了就po上來吧.
自製化的navigation bar到底有多彈性呢?
我想改變navigation bar上面按鈕的樣式,可以!
想改變navigation bar的高度,可以!
想給navigation bar上個圖片,可以!
那..那navigation bar上按鈕的位置呢? 還是可以!!

如果技巧太鼈三就包涵一下啦:P
navigation bar中的按鈕參照UIBarButtonItemStyle所定義項目少了custom這項
不過可以透過initWithCustomView的方式建立自訂的按鈕
詳細作法如下:
1. 先建立一個UIButton,設定其大小位置以及各狀態對應的圖片,最後還要一個action的指向

UIButton * fooButton = [UIButton buttonWithType:UIButtonTypeCustom];

fooButton.bounds = CGRectMake(0, 0, 40.0, 40.0);

[fooButton setImage:[UIImage imageNamed:@"foo.png"] 

   forState:UIControlStateNormal];

[fooButton addTarget:self 

        action:@selector(fooFired:) 

     forControlEvents:UIControlEventTouchUpInside];

2. 接著new一個UIBarButtonItem後,加入navigationItem(這邊以右邊為例)

UIBarButtonItem *fooBarButtonItem = [[UIBarButtonItem alloc] initWithCustomView:fooButton];

 self.navigationItem.rightBarButtonItem = fooBarButtonItem;

 [fooBarButtonItem release];

(trick 1) 接下來講講navigation bar的高度怎麼改變,
網路上可以找到一些方法,不過直接改變高度似乎不可行(至少我自己試過不行)
self.navigationController.navigationBar.frame.size.height
另外一個就正常啦,set自己想要的大小位置

[self.navigationController.navigationBar 
setFrame:CGRectMake(0, 0, self.view.width, height)];

(trick 2) 給navigation bar上個圖片也不會太難
1. 首先new一個UIImageView

UIImageView * banner = [[UIImageView alloc]

initWithFrame:CGRectMake(0, 0, width, height)];

2. 指定這個ImageView載入的圖片

banner.image = [UIImage imageNamed:@"banner.png"];

3. 透過addsubview的方式加進navigation bar(這裡額外指定layer在最底層)

[self.navigationController.navigationBar insertSubview:banner atIndex:0];

 self.navigationController.titleView = banner;  上面這個作法會讓titleView蓋過title的字 (very important)

咳~醜媳婦終究還是要見公婆
改變navigation bar按鈕位置的方法有點投機
如果想要達到下圖的樣子要善用trick1跟trick2

首先在我們改變navigation bar高度的過程中
一定會發現按鈕的位置都偏下,就像下面的圖

沒關係,我們在navigation bar上面放一個高度較高,size較大的圖片蓋過去
如此一來navigation bar上面的按鈕怎麼看都會在中間啦!

順帶一提:
自訂的navigation bar剛開始跑起來都還好端端的,
但是隱藏過後又要顯示時,
按鈕設定全跑了,navigation bar高度也會回復預設值.
後來解決的方法還滿暴力的,
就是要再度顯示之前,再設定一次navigation bar的frame size

[self.navigationController.navigationBar 
setFrame:CGRectMake(0, 0, width, height)];
[self.navigationController setNavigationBarHidden:NO 
                                       animated:NO];

Update:
如果rotate會導致navigation bar上面的button位置跑掉,
表示其高度被設定回預設值,
解決的方法也是在rotate完成後,再設定一次navigation bar的frame size

- (void)didRotateFromInterfaceOrientation:(UIInterfaceOrientation)fromInterfaceOrientation {

  //set your frame size here

}

             stackoverflow - BarButtonItem

2010年10月13日 星期三

iPhone/iPad start apps with specific orientation and device detection

好久沒po筆記了,只能說俺的惰性實在是太容易復發了
一般來說iPhone跟iPad一執行程式起來都是直立狀態
(PortraitOrientation)

如果想指定啟動後就是橫著的方向,設定的方式如下:
1. 因為是app一開始執行就要做的動作,
   所以設定也是在一開始的ViewController裡面
    {ProjectName}ViewController.m  -->
    - (BOOL)shouldAutorotateToInterfaceOrientation:
            (UIInterfaceOrientation)interfaceOrientation

2. 修改並指定interfaceOrientation朝左或右
   return YES;
   return (interfaceOrientation == UIInterfaceOrientationLandscapeLeft);
   or
   return (interfaceOrientation == UIInterfaceOrientationLandscapeRight);

   補充說明一下 return YES的作法:
   device會參考plist中的Supported interface orientations欄位,
   有指定到的方向device會自己做旋轉動作.

   另外,UIInterfaceOrientationLandscape與UIDeviceOrientationLandscape
   的方向是剛好相反的(這特性可以被作為一些判斷依據)

3. 在參考資料的過程中,有這樣的需求是程式在iPhone跟iPad起始的方向要不同
   一樣是在原處動手腳,加上一些判斷式就能夠分辨device種類了.
   BOOL iPad = NO;
#ifdef UI_USER_INTERFACE_IDIOM
   iPad = (UI_USER_INTERFACE_IDIOM() == UIUserInterfaceIdiomPad);
#endif
   if (iPad) {
      // 條件成立表示device為iPad,執行環境iOS3.2以上
   } else {
      // 條件不成立有兩種可能1.device是iPhone或iPod
      // 2.執行環境iOS3.2以前版本不支援UI_USER_INTERFACE_IDIOM
   }

有興趣可以看一下UI_USER_INTERFACE_IDIOM在UIDevice.h的定義
目前我執行起來沒有什麼問題~
網路上有很多討論,如果是universal apps又是another story了:)

很開心在網路上開始看到有人site我的文章了耶~
但是可以請好心的註明一下出處嗎?

參考資料: JEFF LAMARCHE's blogger
               UIDevice Class Reference
               Ole Begemann's blogger
               Sangraal at Programbles
               BillyGiggles at iphonedevsdk


2011/01/03 補充:
iOS version detection

既然有偵測device 型號的方法
iOS版本的偵測當然也不能缺席

#ifdef __IPHONE_3_0
// works on >= iOS 3.0
#else
// works on < iOS 3.0
#end

或

float ver = [[[UIDevice currentDevice] systemVersion] floatValue];
if (ver >= 3.0) {
    // Only executes on version 3 or above.
}
資料來源:stackoverflow

2010年9月21日 星期二

iPhone Live audio streaming using AudioQueue


原本用AVAudioPlayer來播放一些音效感覺很方便,
可是要播放即時的音訊串流就沒輒了.
請見 Technical Q&A QA1634

好吧~那就自立自強捲起袖子… 趕緊google阿!
不過google大神給的答案實在很朦朧,
勉勉強強找到的殘破程式碼也有看沒有懂.

幸好天無絕人之路 :)
Apress出的iPhone cool projects這本書第六章有寫捏,
又有source code可以run,實在"揪甘心"阿.


官方網站


範例程式:下載

如果剛點開範例程式,跟我一樣有頭暈眼花的症狀.
那不用擔心,沒有這麼難,看完下面解釋說不定就懂了.

從架構上來講,一共分成三個部分:

1. AudioPlayer跟AudioRequest可以視作一個大項
    主要負責下達URLrequest,並將收到的data回傳給AudioStream
    另外就是擔任AudioStream的委託(delegate)去使用AudioQueue

2. AudioStream有三件主要的事情
    * 將一收到的data進行parse並得到StreamID
    * 有了StreamID之後會分成 propertyCallback與packetCallback
       先講propertyCallback, 其目的顧名思義就是要辨識Audio的屬性
       就想像成一段資料收進來,需要貼上標籤,註明格式,頻率等等
    * packetCallback會將收進來的stream分成數個packet
       然後請委託(delegate)幫忙執行AudioQueue的程式部分

3. AudioQueue會接受來自委託(delegate)的幾件事情
    * AudioQueueNewOutput會產生一個新的playback audio queue物件
    * AudioQueuePlay會開始播放AudioQueue裡頭的音訊
    * 上述兩項是延續自propertyCallback的部份,在packetCallback這邊
       因為有一整段stream的大小,所以透過AudioQueueAllocateBuffer給定
       適當的buffer size後,使用AudioQueueEnqueueBuffer一直塞buffer
       到audio queue就會播出我們要的串流音訊啦!


NOTE: 2011/01/10
這個範例被我拿來改用之後發現有memory allocation的問題
我原以為是我改壞了 才造成memory allocation不斷飆升的情況
最近花了一點時間修改一下 發現問題就出在AudioQueueAllocateBuffer
這個function不應該在data每次進來都做一次
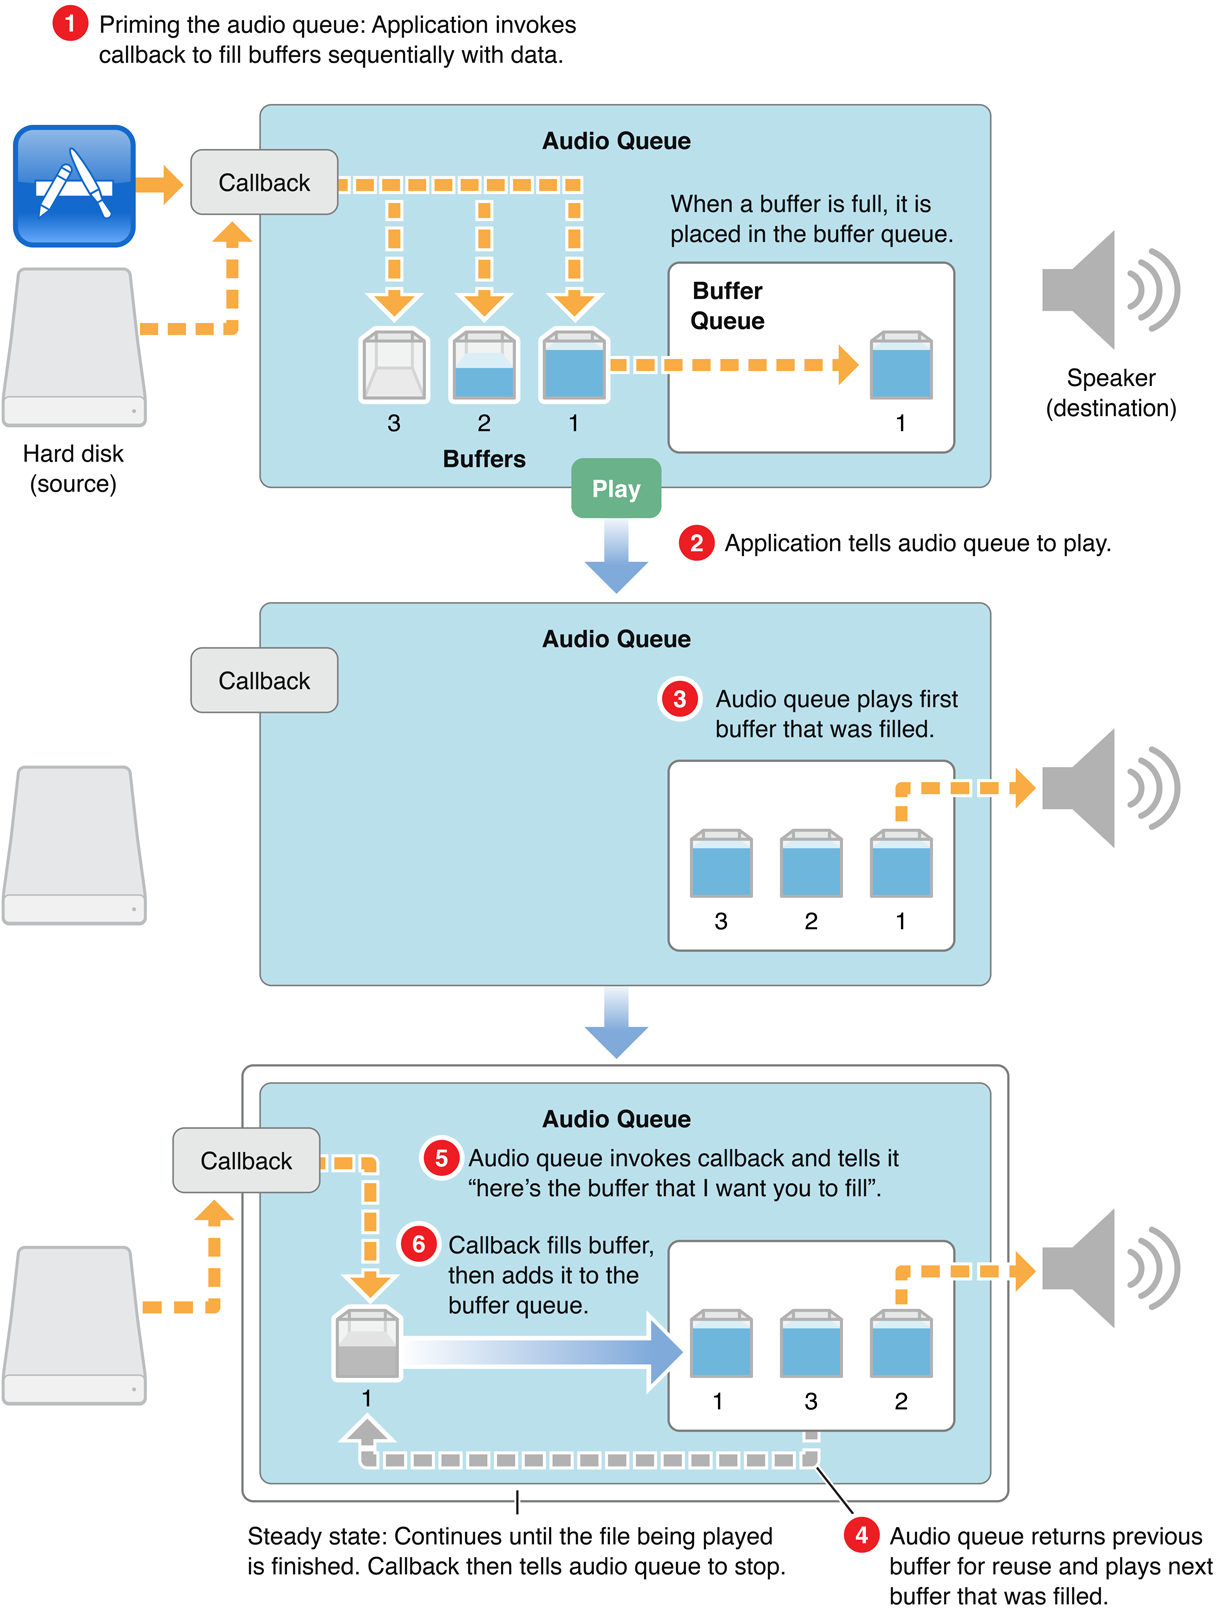
如果好好看過Apple提供的playback示意圖
AudioQueueAllocateBuffer只會在AudioQueue宣告出來後指定好

講是這樣講啦~
實際測試了一下書中範例給的mp3
neilmix[dot]com[slash]book[slash]etude[dot]mp3
嗯…一切自我感覺良好,沒有問題
換成linear PCM格式的wav source…結果是"大崩壞"!
追了很久發現有一個叫packetDescription的structure資料全都是null,
難怪在memory copy時都會造成crash.

所以精華來啦~
1. 這邊mp3的audio stream是VBR格式,也就是說每個packet大小可能不一,
    因此packetDescription會特別記錄這些資訊.
    linear PCM的wav是CBR格式自然沒有這些資料,
    所以簡單的方法就是把packetDescriptions copy這段註解掉.

1
2
3
4
5
memcpy(outBufferRef-&gt;mAudioData, data.bytes, data.length);
outBufferRef-&gt;mAudioDataByteSize = data.length;
//memcpy(outBufferRef-&gt;mPacketDescriptions, packetDescriptions, 
  sizeof(AudioStreamPacketDescription) * packetCount); 
outBufferRef-&gt;mPacketDescriptionCount = packetCount;


2. 由於CBR格式中的bit rate是固定關係, AudioQueueEnqueueBuffer後兩個
    參數為0,跟NULL.

3. 總結來講,AudioQueue service是精隨.只要搞清楚流程,一邊餵進Audio基本資料
    另一邊allocate好audio queue把data依序塞進去,輕鬆播放串流音訊非難事!

參考資料: iOS Reference Library
                zonble
                cocoaChina
                stackoverflow (synthesize with CoreAudio)
                stackoverflow (iPhone combine audio files)    

歐~差點忘了,
在iOS4的simulator環境下跑,開始的時候都會頓一下
log會出現"AddRunningClient starting device on non-zero client count"訊息
雖然不會造成什麼大問題,不過這樣卡卡真的有點討厭就是了
網路上一片無解阿~討論串

2010年9月20日 星期一

iPhone get rid of UIColor

還在用UIColor嗎?嫌系統顏色不夠豐富嗎?
如果想使用hex value來自定色彩
網路上都有提供簡單作法:

1. 把下面整段marco複製到最前頭,define好RGB的範圍
#define UIColorFromRGB(rgbValue) [UIColor \
colorWithRed:((float)((rgbValue & 0xFF0000) >> 16))/255.0 \
green:((float)((rgbValue & 0xFF00) >> 8))/255.0 \
blue:((float)(rgbValue & 0xFF))/255.0 alpha:1.0]

2. 之後就有UIColorFromRGB()這個method可以用.例如:
[aButton setTitleColor:UIColorFromRGB(0x999999) 
              forState:UIControlStateNormal];

3. 就這樣,很簡單的~

   參考資料:iPhone Dev SDK
                 eric e. dolecki

2010年9月13日 星期一

iPhone 使用NSLog來顯示各種型態資料

我在xcode的開發過程中,
除了使用build and debug mode來逐一檢查參數的值
有時候也需要在build and run mode底下留一些訊息,
這時候一定會用到NSLog.
可是使用上若是沒注意資料型態,胡亂指定可是會導致crash的,
因為邪惡的compiler在編譯過程中根本不會有錯誤阿!

所以這邊筆記一下常用的資料型態取法
NSLog(@"%@",myobj);

%@         object
%d, %i     signed int
%u         unsigned int
%f         float/double

%x, %X    hexadecimal int
%o         octal int
%zu        size_t
%p         pointer
%e         float/double (in scientific notation)
%g         float/double (as %f or %e, depending on value)
%s         C string (bytes)
%S         C string (unichar)
%.*s       Pascal string 
(requires two arguments, pass pstr[0] as the first, 
pstr+1 as the second)

%c         character
%C         unichar

%lld       long long
%llu       unsigned long long
%Lf        long double

資料來源: cocoadev
               cocoachina

這篇出自cocoachina的精華文章更清楚喔

2010.12.08  補充顯示boolean參數方法
1
NSLog(@"Bool object is: %@ ",(boolobj ? @"YES" : @"NO"));

2011.10.21 補充顯示CGPoint的方法
1
NSLog(@"The point is: %@ ",NSStringFromCGPoint(point));

內容回應